
Master Clematis Propagation with These Expert Tips and Tricks takes center stage, beckoning readers into a world of lush, vibrant vines. Clematis, known for their stunning blooms and versatility, can be easily propagated using various methods, allowing gardeners to expand their collections and share these beauties with others.
Whether you’re a seasoned green thumb or a budding enthusiast, this comprehensive guide will equip you with the knowledge and techniques to successfully propagate clematis, ensuring a flourishing garden filled with these captivating climbers.
From understanding the different types of clematis and their ideal growing conditions to mastering the art of softwood and hardwood cuttings, layering, and transplanting, this guide covers all aspects of clematis propagation. We’ll delve into the advantages and disadvantages of each method, providing step-by-step instructions and helpful tips to maximize your success.
By following these expert insights, you’ll gain the confidence to propagate clematis effortlessly, creating a haven of blooming splendor in your garden.
Understanding Clematis: A Versatile Vine
Clematis, a genus of flowering vines, offers a captivating array of colors, shapes, and sizes, making them a beloved choice for gardeners seeking to add vibrant vertical interest to their landscapes. With their captivating blooms and diverse growth habits, these climbing beauties can transform any garden space into a breathtaking spectacle.
Types of Clematis and Their Growth Habits
Clematis species exhibit a remarkable diversity in growth habits, ranging from compact varieties suitable for containers to vigorous climbers that can reach impressive heights. Understanding these variations is crucial for selecting the right clematis for your specific garden space and desired aesthetic.
- Group A Clematis:These varieties, often referred to as “small-flowered clematis,” are known for their delicate, star-shaped flowers that typically appear in clusters. They are generally smaller in size and are ideal for growing in containers or as groundcovers. Examples include Clematis ‘alpina’ and Clematis ‘montana’.
- Group B Clematis:This group encompasses a wide range of clematis varieties, featuring large, showy flowers in various colors and shapes. They are typically vigorous climbers that thrive on trellises, fences, and walls. Popular examples include Clematis ‘Jackmanii’ and Clematis ‘Ville de Lyon’.
- Group C Clematis:Known as “late-flowering clematis,” these varieties produce their stunning blooms on new growth, typically appearing in late summer or early fall. They are generally more compact than Group B clematis and are well-suited for smaller gardens or containers. Examples include Clematis ‘Nelly Moser’ and Clematis ‘Etoile Violette’.
Ideal Growing Conditions for Clematis, Master Clematis Propagation with These Expert Tips and Tricks
Clematis thrive in well-drained soil that is rich in organic matter. They prefer a slightly acidic to neutral pH, typically ranging from 6.0 to 7.0. Providing adequate sunlight is essential for their growth and flowering, with most varieties requiring at least six hours of direct sunlight per day.
However, it’s important to note that some clematis varieties, particularly those with delicate blooms, may prefer partial shade, especially during the hottest part of the day.
Watering Requirements for Clematis
Clematis require consistent moisture, especially during their active growing season. Water deeply and thoroughly, allowing the soil to dry slightly between waterings. During periods of drought, it may be necessary to water more frequently. Avoid overwatering, as this can lead to root rot.
Benefits of Growing Clematis
Clematis offer a multitude of benefits for gardeners seeking to enhance their landscapes.
- Stunning Blooms:Clematis are renowned for their captivating flowers, which come in a wide array of colors, shapes, and sizes. Their vibrant blooms add a touch of elegance and beauty to any garden.
- Vertical Interest:Clematis are ideal for adding vertical interest to gardens, climbing trellises, fences, walls, and other structures. They can create a sense of privacy and add a dramatic touch to the landscape.
- Attracting Pollinators:Clematis flowers are highly attractive to pollinators, such as bees, butterflies, and hummingbirds, contributing to the biodiversity of your garden.
- Low Maintenance:Once established, clematis are relatively low-maintenance plants, requiring minimal pruning and care.
Propagation Methods
Clematis propagation can be achieved through various methods, each with its own advantages and disadvantages. Understanding the nuances of these techniques will empower you to choose the most suitable approach for your specific needs and desired results.
Softwood Cuttings
Softwood cuttings are taken from the current year’s growth, ideally when the wood is still soft and pliable. This method is particularly effective for clematis varieties that root readily.
Advantages
- High success rate:Softwood cuttings generally root more easily compared to hardwood cuttings.
- Faster rooting time:Softwood cuttings tend to root quicker, allowing for a faster propagation process.
- More readily available:Softwood cuttings can be taken during the growing season, providing a wider window of opportunity for propagation.
Disadvantages
- Limited time frame:Softwood cuttings need to be taken during the active growing season, typically in late spring or early summer.
- Potential for disease:Softwood cuttings can be more susceptible to fungal diseases due to their tender nature.
Step-by-Step Guide
- Select cuttings:Choose healthy, non-flowering stems with actively growing tips. Cuttings should be about 4-6 inches long, with at least two sets of leaves.
- Prepare the cuttings:Remove the bottom set of leaves and make a clean cut just below a node. You can also use a rooting hormone to enhance root development.
- Potting mix:Use a well-draining potting mix, such as a mixture of peat moss, perlite, and vermiculite. Fill a small pot or seed tray with the mix.
- Planting the cuttings:Insert the cuttings into the potting mix, ensuring that at least one node is buried. Water thoroughly.
- Create a humid environment:Cover the pot or seed tray with a clear plastic dome or bag to create a humid environment that promotes rooting.
- Maintain optimal conditions:Place the cuttings in a bright, indirect light location with temperatures between 65-75°F. Water regularly to keep the potting mix moist but not soggy.
- Monitor for rooting:Check for signs of new growth, which indicates successful rooting. This usually takes 4-6 weeks.
- Hardening off:Once the cuttings have rooted, gradually acclimate them to outdoor conditions by removing the plastic cover for increasingly longer periods.
- Transplant:Once the cuttings are hardened off, they can be transplanted into individual pots or directly into the garden.
Hardwood Cuttings
Hardwood cuttings are taken from dormant wood, typically during the late fall or winter months. This method is generally used for clematis varieties that are more challenging to root.
Advantages
- Can be taken during dormancy:Hardwood cuttings can be taken when the plant is dormant, providing flexibility in the propagation process.
- Less susceptible to disease:Dormant wood is less vulnerable to fungal diseases compared to softwood cuttings.
Disadvantages
- Lower success rate:Hardwood cuttings typically have a lower success rate compared to softwood cuttings.
- Longer rooting time:Hardwood cuttings take longer to root, requiring patience and consistent care.
Step-by-Step Guide
- Select cuttings:Choose healthy, mature stems from the previous year’s growth. Cuttings should be about 6-8 inches long.
- Prepare the cuttings:Cut the bottom end of the cutting at a 45-degree angle. Remove any buds or leaves below the top two sets of buds.
- Potting mix:Use a well-draining potting mix, such as a mixture of peat moss, perlite, and vermiculite. Fill a small pot or seed tray with the mix.
- Planting the cuttings:Insert the cuttings into the potting mix, ensuring that at least one node is buried. Water thoroughly.
- Create a humid environment:Cover the pot or seed tray with a clear plastic dome or bag to create a humid environment that promotes rooting.
- Maintain optimal conditions:Place the cuttings in a cool, bright location with temperatures between 40-50°F. Water regularly to keep the potting mix moist but not soggy.
- Monitor for rooting:Check for signs of new growth, which indicates successful rooting. This can take several months.
- Hardening off:Once the cuttings have rooted, gradually acclimate them to outdoor conditions by removing the plastic cover for increasingly longer periods.
- Transplant:Once the cuttings are hardened off, they can be transplanted into individual pots or directly into the garden.
Layering
Layering is a propagation method that involves encouraging roots to develop on a stem while it is still attached to the parent plant. This technique is particularly suitable for clematis varieties that are difficult to root from cuttings.
Advantages
- High success rate:Layering typically has a high success rate, as the stem remains connected to the parent plant, providing a steady supply of nutrients and moisture.
- No need for specialized tools:Layering does not require any special equipment or rooting hormones.
Disadvantages
- Limited number of plants:Layering can only produce a limited number of new plants from a single parent plant.
- Requires more space:Layering requires more space compared to cuttings, as the stem needs to be bent and anchored to the ground.
Step-by-Step Guide
- Select a stem:Choose a healthy, flexible stem from the current year’s growth. The stem should be about 6-8 inches long.
- Prepare the stem:Make a shallow cut on the underside of the stem, about halfway through the wood. This will encourage root development.
- Bend and anchor:Bend the stem down to the ground and secure it in place with a wire, pin, or rock. The cut area should be buried in the soil.
- Maintain moisture:Keep the soil moist and well-drained. You can also cover the buried portion of the stem with a layer of peat moss to retain moisture.
- Monitor for rooting:Check for signs of new growth, which indicates successful rooting. This can take several months.
- Separate the plant:Once the layer has rooted, cut it away from the parent plant and transplant it to its desired location.
Softwood Cuttings
Softwood cuttings are a popular method for propagating clematis because they utilize the plant’s new growth, which is generally more vigorous and easier to root. This method offers a high success rate when done correctly, allowing you to create new clematis plants from existing ones.
Timing for Softwood Cuttings
The ideal time to take softwood cuttings from clematis is during the spring and early summer when the new growth is still soft and pliable. This period typically coincides with the time when the clematis is actively growing and producing new shoots.
Aim for cuttings taken from stems that are about 6-8 inches long and have a diameter of about a pencil.
Preparing the Cuttings
To ensure the success of your softwood cuttings, it’s crucial to prepare them correctly. Here’s a step-by-step guide:
- Select healthy stems:Choose stems that are free from pests, diseases, and damage. They should be actively growing and have a vibrant green color.
- Make precise cuts:Use a sharp knife or pruning shears to make clean, angled cuts at the base of the cutting. The angled cut promotes root development.
- Remove lower leaves:Remove the leaves from the bottom 2-3 inches of the cutting. This prevents them from rotting in the rooting medium.
- Prepare the rooting medium:A well-draining mixture of peat moss, perlite, and vermiculite is ideal for rooting clematis cuttings. This mixture provides the necessary moisture and aeration for root development.
Rooting Softwood Cuttings
Once you’ve prepared the cuttings, you’re ready to root them:
- Fill pots or trays:Fill pots or trays with the prepared rooting medium, leaving about an inch of space at the top.
- Insert the cuttings:Make a hole in the rooting medium using a pencil or your finger and insert the cutting. Ensure that the bottom 2-3 inches of the cutting are submerged in the medium.
- Water thoroughly:Water the cuttings thoroughly, ensuring the entire rooting medium is moistened.
- Create a humid environment:Cover the pots or trays with a plastic dome or plastic wrap to create a humid environment that promotes root development.
- Provide indirect light:Place the cuttings in a location that receives bright, indirect light. Avoid direct sunlight, as it can scorch the leaves.
- Maintain humidity:Check the moisture levels of the rooting medium regularly and water as needed. Ensure that the medium remains moist but not soggy.
- Root development:It can take several weeks for the softwood cuttings to develop roots. Be patient and continue to provide the necessary care.
Hardwood Cuttings
Hardwood cuttings are a reliable method for propagating clematis during its dormant season, typically from late fall to early spring. This method involves taking cuttings from mature, dormant wood, which is less prone to wilting and allows the plant to focus its energy on root development.
Preparing Hardwood Cuttings
Hardwood cuttings are typically taken from the previous year’s growth, which is now dormant. Select healthy, mature stems with a diameter of about pencil thickness. Cut the stems into 6-8 inch lengths, ensuring each cutting has at least 3-4 nodes (the points where leaves or branches grow).
- Cut the stems at a 45-degree angle just below a node.This helps to maximize the surface area for root development.
- Remove the leaves and buds from the bottom 1-2 inches of the cutting.This prevents the leaves from drawing energy away from the roots.
- Dip the cut end of the cutting in rooting hormone.This encourages root growth.
Storing Hardwood Cuttings
Once prepared, hardwood cuttings can be stored until planting.
- Wrap the cuttings in moist paper towels or sphagnum moss.This helps to keep them hydrated.
- Place the cuttings in a plastic bag or container and seal it tightly.This creates a humid environment.
- Store the cuttings in a cool, dark place.A refrigerator is ideal, but a cool basement or garage will also work.
Advantages and Disadvantages of Softwood vs. Hardwood Cuttings
Method |
Advantages |
Disadvantages |
|---|---|---|
Softwood Cuttings |
– Faster rooting time
|
– Limited to the growing season
|
Hardwood Cuttings |
– Can be taken during the dormant season
|
– Slower rooting time
Mastering clematis propagation is all about understanding the plant’s unique needs. From cuttings to layering, there are various methods to create new plants. If you’re looking for similar propagation techniques for another captivating carnivorous plant, check out Turn a Single Venus Fly Trap Into a Garden With These Propagation Tips. Once you’ve mastered the art of propagation, you’ll be well on your way to cultivating a stunning clematis collection.
|
Layering
Layering is a simple and effective propagation method that involves encouraging roots to develop on a stem while it is still attached to the parent plant. This method is particularly well-suited for clematis, as it allows you to create new plants with the same genetic makeup as the parent.
There are several different types of layering techniques, each with its own advantages and disadvantages. Two common methods are air layering and tip layering.
Air Layering
Air layering is a technique that involves rooting a stem while it is still attached to the parent plant. This method is particularly useful for clematis that are difficult to propagate by other methods. It is also suitable for clematis that are already growing in a container, as it avoids disturbing the roots.
- Choose a healthy, mature stem that is at least 1/2 inch in diameter.
- Select a section of the stem that is about 6 inches long and has no buds or branches.
- Using a sharp knife, make a ring cut around the stem about 1 inch wide.
- Carefully remove a small strip of bark from the ring cut, exposing the cambium layer.
- Apply a rooting hormone to the exposed cambium layer.
- Wrap the cut area with damp sphagnum moss and secure it with plastic wrap.
- Keep the moss moist by watering it regularly.
- After a few months, the stem should develop roots. When the roots are about 2 inches long, you can carefully cut the stem below the roots and pot it up.
Tip Layering
Tip layering is a simpler method of layering that involves rooting the tip of a stem. This method is well-suited for clematis that are growing near the ground.
- Select a healthy, flexible stem that is about 6 inches long.
- Bend the stem to the ground and make a shallow cut on the underside of the stem.
- Apply rooting hormone to the cut.
- Cover the cut with soil and secure the stem with a wire or rock.
- Keep the soil moist and the stem upright.
- After a few months, the stem should develop roots. When the roots are about 2 inches long, you can carefully cut the stem from the parent plant and pot it up.
Tips for Successful Root Development
- Choose a healthy, mature stem that is free of pests and diseases.
- Use a sharp knife or pruning shears to make clean cuts.
- Apply a rooting hormone to the cut area to encourage root development.
- Keep the rooting medium moist but not waterlogged.
- Provide shade and protection from the wind.
- Be patient, as root development can take several months.
Caring for Clematis Cuttings
Once your clematis cuttings have rooted, they need the right conditions to thrive and grow into healthy plants. This involves providing the right amount of light, humidity, and temperature, as well as ensuring proper watering and fertilization.
Light Requirements
Clematis cuttings need bright, indirect light to grow well. Direct sunlight can scorch the delicate leaves and stems, so it’s important to provide shade during the hottest part of the day. A south-facing window with a sheer curtain or a shaded outdoor location is ideal.
You can also use grow lights to supplement natural light, especially during the winter months.
Humidity and Temperature
Clematis cuttings prefer a humid environment. You can increase humidity by misting the cuttings regularly or placing them on a pebble tray filled with water. The ideal temperature for clematis cuttings is between 65-75°F (18-24°C). Avoid placing them in areas that are too cold or too hot.
Watering
Water your clematis cuttings regularly, keeping the soil moist but not soggy. The frequency of watering will depend on the type of soil and the ambient temperature. Allow the top inch of soil to dry out between waterings.
Mastering clematis propagation requires patience and attention to detail, just like navigating a sprawling orchard. To truly understand the art of clematis propagation, you need to know when and how to prune, just as you would learn to identify the best fruit-bearing trees in an orchard.
For a deeper dive into the world of fruit-bearing trees, check out How to Explore Harvest Moon Orchard Like a Pro. This same meticulous approach to understanding the life cycle of plants is key to success with clematis propagation, allowing you to cultivate vibrant, healthy vines.
Use lukewarm water to avoid shocking the roots.
Fertilizing
Young clematis plants need regular fertilization to promote growth. Use a balanced liquid fertilizer diluted to half strength every two weeks during the growing season. Avoid over-fertilizing, which can damage the roots.
Protecting from Pests and Diseases
Clematis cuttings can be susceptible to pests and diseases, especially if they are not properly cared for. Common pests include aphids, spider mites, and whiteflies. Diseases include powdery mildew, leaf spot, and wilt. Regularly inspect your cuttings for signs of pests and diseases.
Use insecticidal soap or neem oil to control pests. Treat fungal diseases with a fungicide.
Transplanting Clematis
Transplanting clematis cuttings to their permanent location is a crucial step in their journey from propagation to thriving vines. Timing is key for successful transplantation, ensuring the cuttings have the best chance to establish themselves in their new home. This section delves into the optimal time for transplanting, the preparation required for the planting site, and the techniques for successful transplantation, providing valuable insights for ensuring the healthy growth of your clematis.
Optimal Time for Transplanting
The ideal time to transplant clematis cuttings depends on the type of cutting used and the climate in which you live.
- Softwood cuttings:These cuttings, taken in spring or early summer, should be transplanted after they have developed a strong root system, typically within 6-8 weeks.
- Hardwood cuttings:These cuttings, taken in late fall or winter, should be transplanted in early spring after the last frost.
Transplanting during these periods ensures that the cuttings have ample time to establish roots before the onset of extreme temperatures or harsh weather conditions.
Preparing the Planting Site
A well-prepared planting site is essential for the success of transplanted clematis.
- Choose a location with ample sunlight:Clematis thrives in full sun to partial shade, receiving at least 6 hours of sunlight per day.
- Prepare the soil:Clematis prefers well-drained soil that is rich in organic matter. Amend the soil with compost or aged manure to improve its structure and fertility.
- Dig a planting hole:Dig a hole twice as wide and as deep as the root ball of the cutting.
- Amend the soil in the hole:Mix the excavated soil with compost or other organic matter to improve drainage and nutrient content.
Transplanting the Cuttings
Transplanting clematis cuttings requires careful handling to minimize stress and ensure successful establishment.
- Gently remove the cutting from its container:Support the base of the cutting and gently tap the container to loosen the root ball.
- Inspect the root system:Ensure the roots are healthy and free from damage. If necessary, trim any damaged or circling roots.
- Place the cutting in the planting hole:Position the cutting so that the top of the root ball is level with the surrounding soil.
- Backfill the hole with amended soil:Firm the soil around the base of the cutting to ensure good contact with the roots.
- Water thoroughly:Water the newly transplanted cutting deeply to settle the soil and provide moisture for root establishment.
Supporting and Staking Newly Transplanted Clematis
Newly transplanted clematis plants require support to help them grow upright and prevent damage.
- Provide a sturdy support structure:Use a trellis, fence, or other suitable support that can accommodate the vine’s growth habit.
- Secure the vine to the support:Gently tie the vine to the support structure using soft materials like twine or plant ties.
- Monitor the vine’s growth:As the vine grows, adjust the support as needed to ensure it remains upright and healthy.
Mastering Clematis Propagation

Clematis propagation is a rewarding process that allows gardeners to expand their collections and share their favorite varieties with others. This comprehensive guide provides a step-by-step approach to successfully propagate clematis, covering the various methods and essential techniques.
Visual Guide to Clematis Propagation
The visual guide illustrates the key steps involved in each propagation method.* Softwood Cuttings:
Image
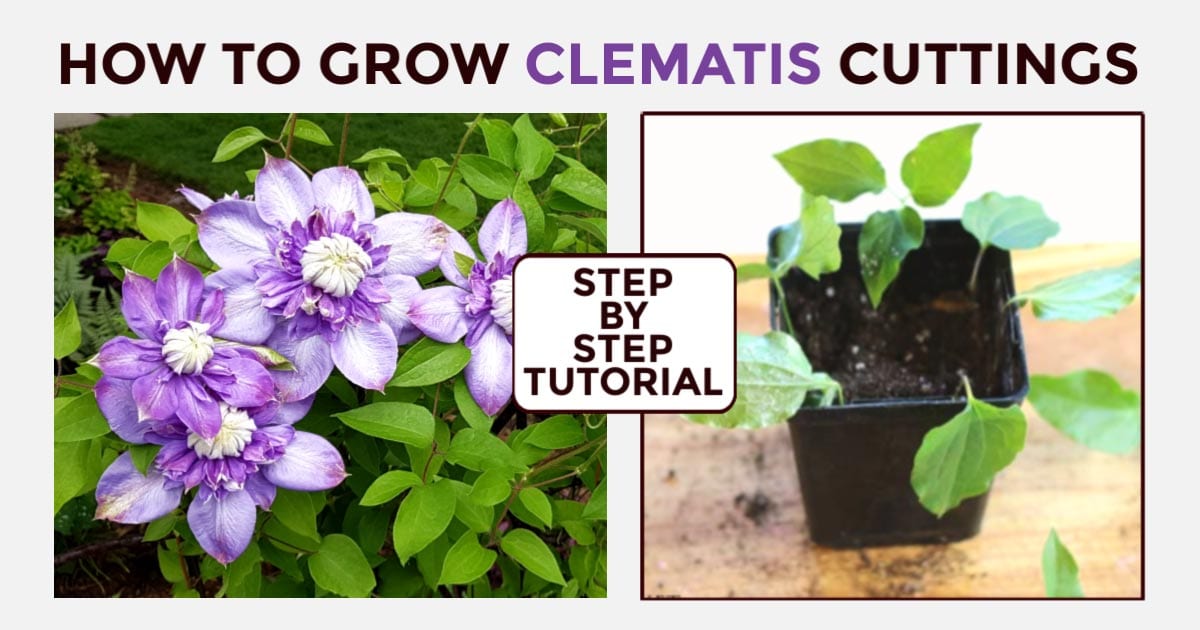
A close-up image of a softwood cutting being taken from a clematis stem. The cutting is approximately 4-6 inches long, with several nodes.
Description
Softwood cuttings are taken from new growth that is still flexible and green. The cutting should include at least two nodes, which are the points where leaves grow.
Hardwood Cuttings
Image
A depiction of a hardwood cutting taken from a mature clematis stem during the dormant season. The cutting is approximately 6-8 inches long and includes several nodes.
Description
Hardwood cuttings are taken from mature, dormant stems during the winter months. They are typically thicker than softwood cuttings and have a more woody texture.
Layering
Image
A visual representation of a clematis stem being layered in a pot or directly in the ground. The stem is bent and buried in the soil, with a portion of the stem exposed above the soil.
Description
Layering involves bending a stem of the clematis to the ground and burying a portion of it in the soil. The buried section will develop roots, and a new plant can be separated from the parent plant once it has established.
Tools and Techniques
Image
A collection of tools commonly used for clematis propagation, including a sharp knife or pruning shears, a rooting hormone, a propagation tray or pot, and a clear plastic dome or bag.
Description
These tools are essential for preparing cuttings, stimulating root development, and providing a suitable environment for rooting.
Table of Propagation Methods
The following table summarizes the key steps involved in each propagation method:| Method | Timing | Steps ||—|—|—|| Softwood Cuttings | Late spring to early summer | 1. Take cuttings from new growth. 2. Remove lower leaves. 3.
Dip the cut end in rooting hormone. 4. Plant cuttings in a propagation tray or pot. 5. Cover with a clear plastic dome or bag.
6. Maintain humidity and warmth. || Hardwood Cuttings | Late fall to early winter | 1. Take cuttings from mature stems. 2.
Cut the stem into 6-8 inch sections. 3. Dip the cut end in rooting hormone. 4. Plant cuttings in a propagation tray or pot.
5. Place in a cold frame or protected area. 6. Water regularly. || Layering | Spring to early summer | 1.
Choose a healthy stem. 2. Bend the stem to the ground and bury a portion in the soil. 3. Secure the stem in place.
4. Water regularly. 5. Once the stem has rooted, separate it from the parent plant. |
Checklist for Successful Clematis Propagation
This checklist Artikels the critical steps to ensure successful clematis propagation:* Select healthy parent plants:Choose vigorous and disease-free clematis plants for propagation.
Prepare cuttings or layering material
Ensure the cuttings or layering material are taken from the appropriate location and at the correct time.
Use sharp tools
Employ clean and sharp tools to avoid damaging the cuttings or layering material.
Apply rooting hormone
Use a rooting hormone to encourage root development.
Provide a suitable environment
Maintain the appropriate humidity, warmth, and light conditions for rooting.
Water regularly
Keep the cuttings or layering material consistently moist, but avoid overwatering.
Transplant when ready
Once the cuttings or layering material have developed a good root system, transplant them into individual pots or the garden.
Protect from pests and diseases
Monitor the plants for any signs of pests or diseases and take appropriate action.
“Successful clematis propagation requires patience, attention to detail, and a little bit of luck. By following these steps, you can increase your chances of success and enjoy the beauty of clematis in your garden.”
Summary: Master Clematis Propagation With These Expert Tips And Tricks
With a thorough understanding of clematis propagation techniques, you’ll be empowered to cultivate these stunning vines, transforming your garden into a breathtaking spectacle of color and texture. From the delicate beauty of softwood cuttings to the robust growth of hardwood cuttings and the simplicity of layering, each method offers unique advantages, allowing you to choose the approach that best suits your needs and preferences.
As you embark on your clematis propagation journey, remember to nurture your cuttings with care, providing them with the optimal conditions for growth and development. By following the expert tips and tricks Artikeld in this guide, you’ll be well on your way to creating a flourishing collection of clematis, adding a touch of elegance and vibrancy to your garden for years to come.
Questions Often Asked
What is the best time of year to propagate clematis?
The best time to propagate clematis depends on the method you choose. Softwood cuttings are best taken in the spring or early summer, while hardwood cuttings are best taken in the late fall or winter. Layering can be done throughout the growing season.
What is the difference between softwood and hardwood cuttings?
Softwood cuttings are taken from new growth that is still soft and flexible, while hardwood cuttings are taken from dormant wood that is hard and woody. Softwood cuttings are generally easier to root than hardwood cuttings, but hardwood cuttings are more durable and can be stored for longer periods of time.
How do I know if my clematis cuttings have rooted?
You can check for roots by gently tugging on the cutting. If it resists, then it has likely rooted. You can also check for new growth, which is a good sign that the cutting is establishing itself.
What should I do if my clematis cuttings are not rooting?
If your cuttings are not rooting, there are a few things you can try. Make sure you are using fresh, healthy cuttings. You can also try using a rooting hormone or a humidity dome to help the cuttings root. If all else fails, you may need to try a different propagation method.
